ProbeApp for Centroid CNC12
ProbeApp for Mill & Routers that integrates with Centroid CNC12
Project maintained by swissi2000 Hosted on GitHub Pages — Theme by mattgraham
3 Axis Center and Top Probing Cycle
Description
Find the center and top of a Rectangular Stock to set WCS 0 for X, Y and Z-Axis with one probing cycle. This probing cycle is available for all versions of CNC12.
Note that this probing cycle can also be used if you want to set WCS 0 at a corner of your model and you want to distribute the excess of the X and Y-Dimension of the stock evenly around your model for better machining. For that use case, you would configure the X and Y-Offset to half of your models X and Y-Dimensions. You can specify a positive or negative offset depending on what corner of the model you would like to set your WCS 0.
Implementation Details
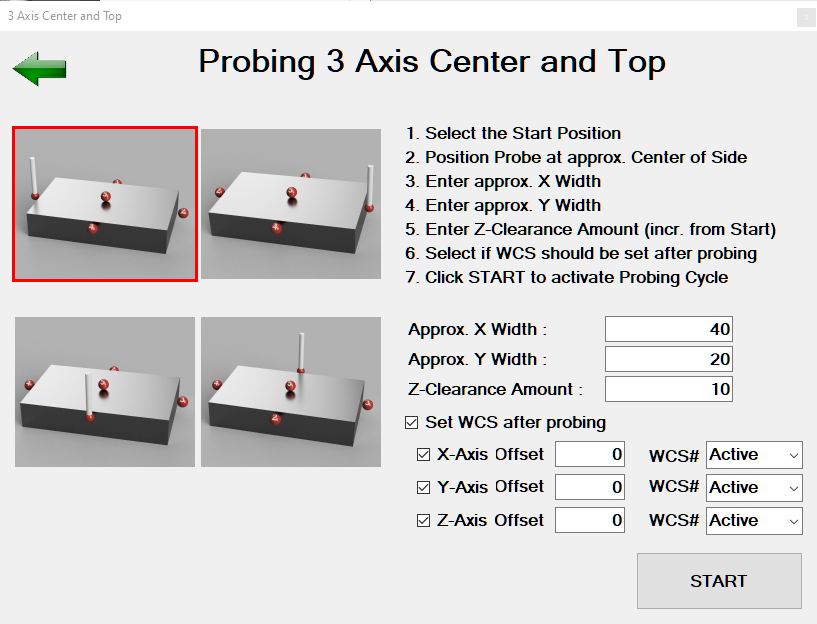
Any of the four sides of the rectangular stock can be selected as the start point of the probing cycle. The probe needs to be placed at the approximate center of the selected start side. The Z-Height has to be set at the level the measurements needs to be taken on the surface.
The probe will make the following moves and measurements:
- Takes the first measurement at the selected side where the probe has been placed
- Move Z up the distance given by Z-Clearance Amount
- Move over to the opposite side of the starting point
- If the Z-Clearance Amount was too short and an unexpected probe trip occurs while trying to traverse, the Z-Axis will move up in increments until the probe can traverse or a llimit is been triggered.
- At the opposite side, the Z-Axis will drop down to the level of the starting point from the first measurement
- If the Approx. X/Y Width given was too short and the probe trips while trying to get down to the Z-Height, the probe will advance in increments until it can drop down to the Z-Height or a limit is triggered
- The second measurement will be taken at the opposite side of the first measurement
- Move up to the Z-Clearance Height
- Traverse to the center position of the two measurements
- Traverse on the second axis in the positive direction for half the Approx. X/Y Width
- Drop down to Z-measuring height
- Repeat the same moves as for the first axis
- After the X and Y-Axis measurements, the probe will be at the center point of the rectangular stock.
- Z-Axis measurement will be taken at the center
At the end of the probing cycle, the probe will be at the center of the Rectangular Stock at the Probing Recovery Distance (System Parameter #13) above the Z-Surface and the X and Y-Width will be displayed:
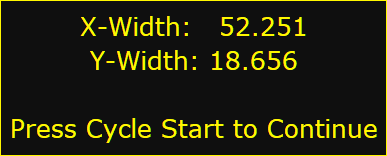
Note that this message can be surpressed if “Set WCS after probing” is checked and the configuration settings have been made to skip the measurement display. See Configuration Options for details.
If “Set WCS after probing” was checked, the WCS reset message will be displayed:
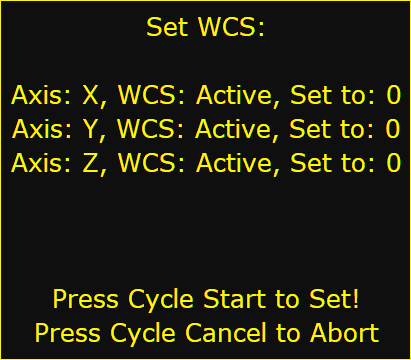
Note that this message can also be surpressed if a direct WCS reset is desired withou a prior WCS Reset Info message display. See Configuration Options for details.
Be aware that the DRO for the Z-Axis will not show 0 after the WCS reset as the probe is above the Z-Surface by the Probing Recovery Distance (System Parameter #13) when the WCS is being reset.
Probing Parameters
Approx. X/Y Width
The Approx. X/Y Width is the distance the probe needs to travel accross the stock along the X/Y-Axis to get to the opposite side. Be generous with this amount and rather error on the plus side rather than being too short.
If this amount is too short, the probe will be tripped while trying to move down on Z to get to the probing height. When this happens, the retry cycle will be activated that will advance the probe in increments until it’s clear to drop down on Z. Should the retry cycle hit any limits (e.g Probing Search Distance or travel limit) the probing cycle will be aborted with an error message.
Z-Clearance Amount
The Z-Clearance Amount specifies the distance the probe needs to move up on Z from the start point to traverse to the opposite side. Be generous with this amount and rather error on the plus side rather than being too low.
If this amount is too low, the probe will be tripped while trying to traverse. When this happens, the retry cycle will be activated that will advance the probe in increments until it has enough clearing height to traverse. Should the retry cycle hit any limits (e.g Probing Search Distance or travel limit) the probing cycle will be aborted with an error message.
Set WCS after probing
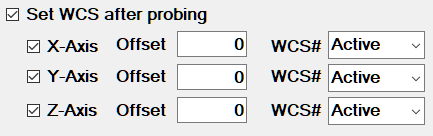
If the WCS box is checked, at least one of the Axis needs to be checked too. By default, WCS 0 for the axis will be set at the center of the Rectangular Stock for the currently Active WCS.
All 3 axis allow to set WCS 0 at an Offset if needed. For an offset in the negative axis direction, a negative value needs to be entered.
Note that the available WCS numbers depend on the version of CNC12:
- CNC12 Free: Only WCS #1 (G54) is available
- CNC12 Pro: WCS #1 - #6 (G54 - G59) are available
- CNC12 Digi: WCS #1 - #18 (E1 - E18 where E1 - E6 is the same as G54 - G59)
Any of the available WCS # can be selected to be reset by the probing cycle.
Start the Probing Cycle
After making all the selections necessary on the screen, pressing the START button will start the parameter validation. A message will be displayed if any of the parameters are missing or invalid

If no validation issues have been found, the ProbeApp will write all the necessary probing commands to
c:\cncm\ncfiles\probing_cycle.cnc
The ProbeApp will close giving control back to CNC12

At this point the Probing Cycle can be started by pressing Cycle Start or aborted with Cycle Cancle.
Closing ProbeApp without a Probing Cycle selections
The Probing Cycle screen can be closed by either pressing the X on the top right corner of the window or pressing the Green Back Arrow on the top left. This will open the ProbeApp main window where the Exit button can be pressed.
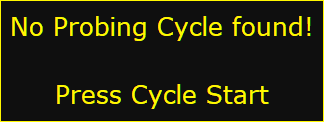
Control will go back to CNC12 where this message will be displayed:
Pressing Cycle Cancle will terminate the cycle immediately. Pressing Cycle Start will bring up this message:
Pressing Cycle Start at this point will also terminate the cycle.