ProbeApp for Centroid CNC12
ProbeApp for Mill & Routers that integrates with Centroid CNC12
Project maintained by swissi2000 Hosted on GitHub Pages — Theme by mattgraham
Tool Offset Manager: No Offset Library
Description
This Method is for machines that do not have fixed Tool Holders and therefore can’t use the CNC12 Tool Offset Library for Tool Height Offsets. This method will enforce that the Tool Height Offsets for all tools are set to 0 in the CNC12 Tool Offset Library as this is a requirement for this method to work properly and safe.
Use the ProbeApp-Tool Setter to measure each Tool Height after each Tool Change as required when the spindle does not support fixed tool holders.
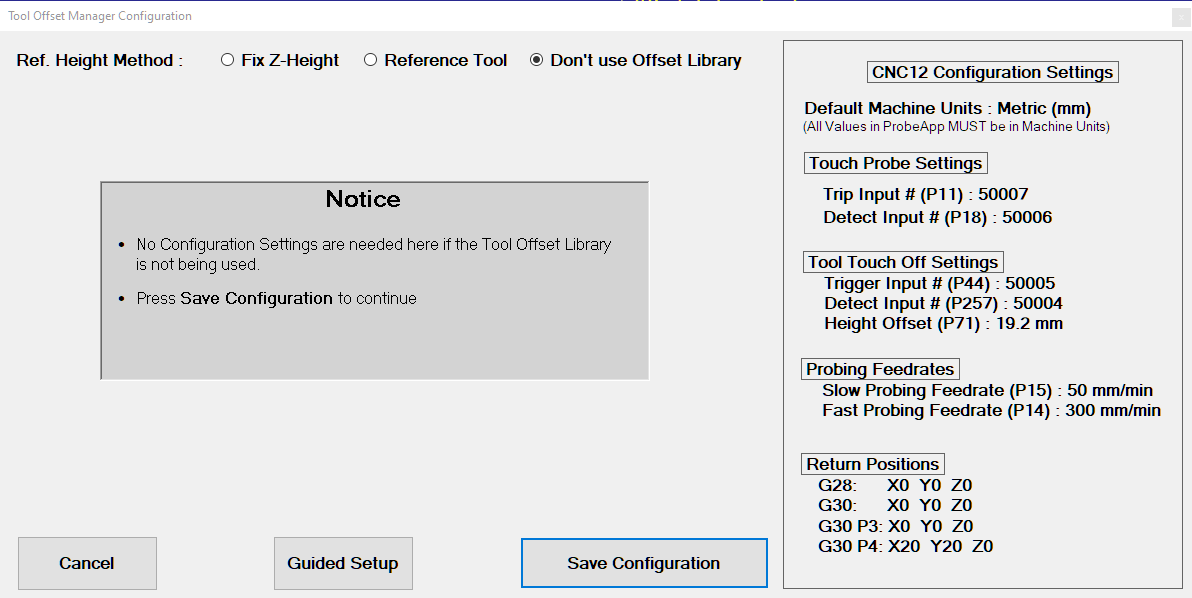
Configuration Settings
The configuration page for the Don’t use Offset Library Method does not require any settings:
Button Functions
- Cancel: Will abort the setup process
- Guided Setup: Use to re-run the Guided Setup if machine information has changed
- Save Configuration: Saves the configuration settings and opens the Tool Offset Manager
Save Configuration
If the Tool Offset Library is not being used to store Tool Height Offsets, all Tool Height Offsets must be set to 0 for a safe operation. If any of the Tool Height Offsets in the CNC12 Offset Library are currently not set to 0, the following warning message will be displayed:

Instructions Page
After the configuration settings are saved, an Instruction screen like this will be displayed:
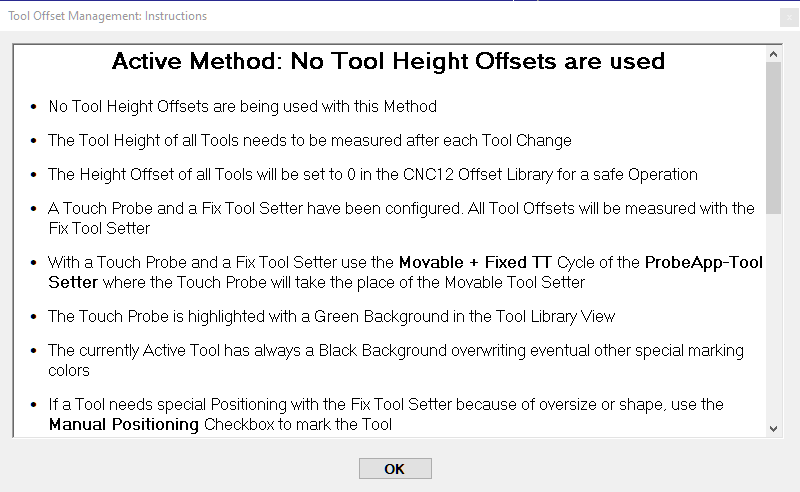
Read this information carefully as the instructions are dynamically created based on the configuration settings. Pressing the OK button will close the Instructions page but the page can be re-opened anytime again with the Instructions button on the Tool Offset Manager main screen.
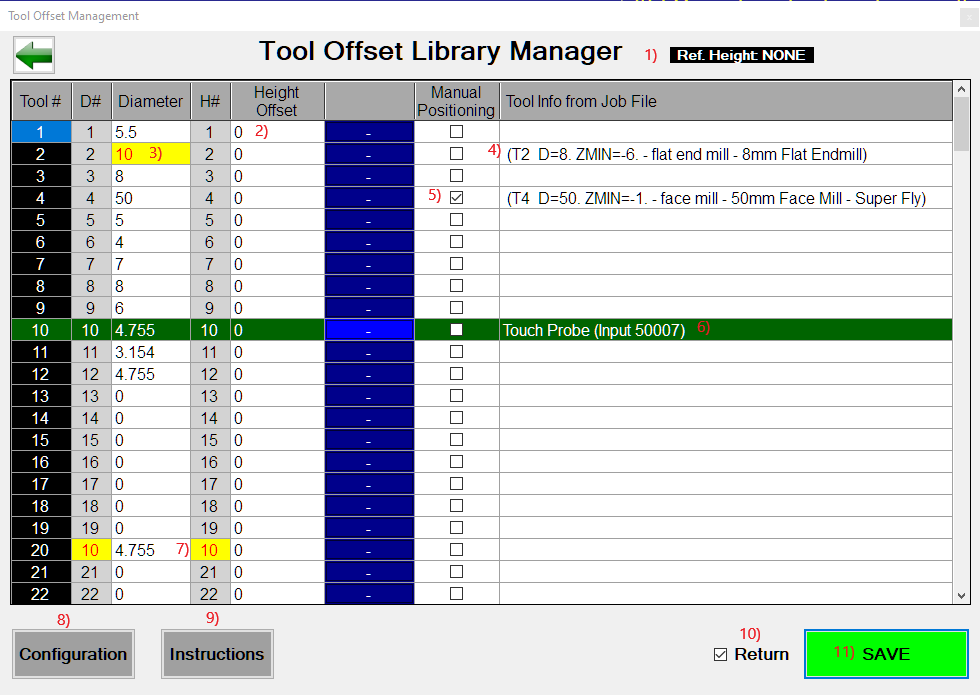
Tool Offset Library Manager
A typical Tool Offset Library Manager main screen for the Don’t use Offset Library Method looks like this:
Feature List
1) Reference Height Method
Indicates which Reference Height Method is currently active
2) Tool Height Offsets
If the Tool Offset Library is not being used to store Tool Height Offsets, all Height Offsets will be forced to be 0. The Height Offset input field in the table is protected and does not allow to add any values.
3) Not matching Tool Diameter
All values that are highlighted with red numbers on yellow background need attention. In this case, the Tool Diameter currently stored in the CNC12 Tool Library does not match the Tool Diameter of this tool listed in the currently open job file and is being highlighted as a warning (see 4) about how Tool Information of the currently open Job File is imported into the Tool Offset Manager).
4) Tool Information from the currently open Job File
When the Tool Offset Manager starts up, the ProbeApp is reading the currently open job file and imports the tool information if the Post Processor that created the job file has placed that information at the beginning comment section of the job file. The Tool number must be in the form of T1, T01 or T001 and the Diameter in the form of D=2.25. Here’s an example how Fusion 360 inserts such Tool Information at the start of a job file as comment:
(T2  D=8. ZMIN=-6. - flat end mill - 8mm Flat Endmill)
(T4  D=50. ZMIN=-1. - face mill - 50mm Face Mill - Super Fly)
5) Manual Tool Positioning
If tools are measured with a Tool Touch Off device at a fixed location, some tools that have a large diameter or are oddly shaped can’t be measured automatically and need to be positioned manually above the Tool Touch Off device before they can be measured.
If this checkbox is being checked for a tool, the tool touch off probing cycle will pause above the Tool Touch Off device with the message to manually position the tool. After the tool has been positioned properly, pressing the Cycle Start button will resume the touch off process.
This checkbox also works for machines that don’t use the Tool Offset library for Tool Height Offsets and are using the ProbeApp-Tool Setter instead to touch off each tool with a fixed Tool Touch Off device.
6) Touch Probe
If a system has a configured Touch Probe, it will be highlighted with a green background and the Tool Info column will label it as the Touch Probe and does also list the Input number the Touch Probe is connected to.
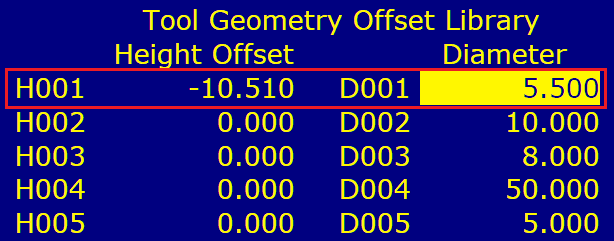
7) Diameter and Height Offset Numbers
It is important to understand that the Diameter Offset number (D#) and the Height Offset number (H#) are not the same as the actual Diameter value (D=5.5) or Height Offset Value (H=-10.51). The CNC12 Tool Library stores the Tool # and for each tool it holds the D# and H# that are associated with that tool. By default, the T#, D# and H# all match, which means that T1 has D1 and H1 assigned. The actual Diameter and Height Offset values for D1 and H1 are stored in a separate table, the Tool Geometry Offset Library.

The CNC12 Tool Library allows to assign any D# or H# to any tool. This can severely complicate things if you start to mess with these assignments as you cannot just assume that T1 has D1 and H1 assigned as it could be any number in the valid range of 1 - 200.
If any D# or H# in the CNC12 Tool Library does not match the T#, the Tool Offset Library Manager will highlight that D# or H# with red font on yellow background to bring that to your attention.
Note that the ProbeApp-Tool Offset Library Manager doesn’t allow you to change D# and H# to T# assignments. Such re-assignments must be completed in the CNC12 Tool Library directly.
8) Configuration Button
When the Tool Offsetter is being launched for the first time, the Guided Setup will automatically start to generate the initial setup and configure everything according to the answers given. The Configuration Button allows reopening the configuration screen to customize settings.
If additional Probing Devices have been added to a machine or the tool holding method has changed, it is recommended to run the Guided Setup again which is accessible from the Configuration screen.
9) Instructions
Press the Instructions Button anytime to reopen the Instructions screen that holds information specific to the current configuration.
10) Return Function
If the Return checkbox is checked, the Tool Offset Library Manager will reopen after the ProbeApp has closed to save data in CNC12 or to execute a Tool Touch Off cycle.
12) EXIT/SAVE Button
The status of this button will change between EXIT and SAVE depending if there’s information that needs to be saved in CNC12. If this button is highlighted in bright green and displays SAVE, there is information that has changed and updates in CNC12 need to be done. Pressing the SAVE Button will close the ProbeApp and the Cycle Start button needs to be pressed to update information in CNC12.